First steps with AWS, Terraform, Jenkins and Ansible
Old content warning
This post is more than 2 years old. It's content might be outdated. Please let me know if you find anything that needs to be fixed: email@me here.
I'm publishing this as an updated version of Scotty Parlor's LEARNING DEVOPS: AWS, TERRAFORM, ANSIBLE, JENKINS, AND DOCKER tutorial. It has allowed me to play with Terraform, Ansible and Jenkins for the first time. Needless to say, I learned a lot. I made some modification here and there where I could.
All the code snippets are initially from Scotty Parlor. Check out his blog and Youtube Channel for more great content!
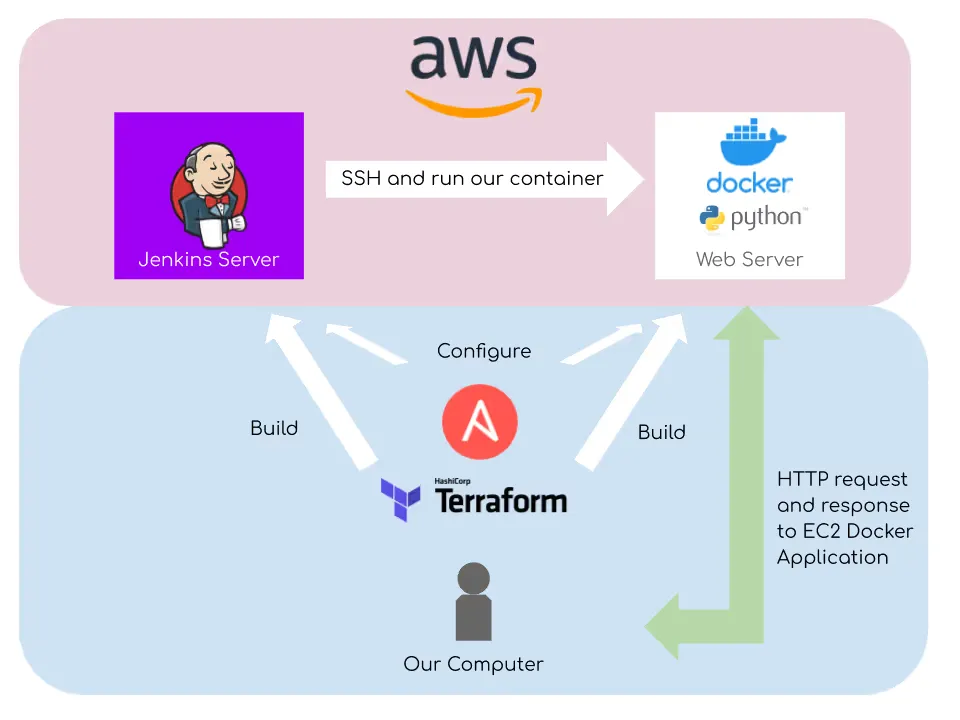
Here's what we'll be building (image is from Scotty's blog post)

Summary of the project:
- Launch two AWS EC2 instances with Terraform and configure them with Ansible. Everything is kept within the Free Tier, so this shouldn't cost anything.
- The first instance will be a Jenkins server, the second instance will be Docker server running a web server container (with Python and the Falcon framework).
- Jenkins will allow us to SSH into the Docker server and control our container (basic pipeline).
We'll be gaining a basic understanding of the following:
- Jenkins, as a tool to launch jobs on remote hosts
- AWS, as a cloud provider
- Infrastructure as Code (IaC) with Terraform
- Ansible, as a provisonning and configuration tool for remote hosts
Prerequisites
- AWS root account to create and use an AWS non root account
- Key pair created in a AWS region
- Docker account
- Github account (to push your final code to a repository)
- And some knowledge of the CLI (I'm on macOS)
Install necessary CLI tools
brew install awscli aws-vault ansible terraformAuthentication with AWS
You then have to run a couple of commands to be able to authenticate with AWS from the command line:
aws configureYou'll be asked to enter your AWS Access Key ID, Secret Access Key, Default region name and Default output format. You can leave the latter blank.
Now run the aws-vault tool we installed to add the non-root account. On macOS, you'll be prompted to define a password to save the credentials.
aws-vault add {name-of-your-non-root-user}All done, you can now successfully authenticate with AWS from the CLI. To validate that it is true, you can run the exec command of aws-vault to confirm it:
aws-vault exec {name-of-your-non-root-user}Terraform
Terraform is an open-source, infrastructure as code, software tool created by HashiCorp. Users define and provide data center infrastructure using a declarative configuration language known as HashiCorp Configuration Language (HCL), or optionally JSON.
Make a folder where you'll keep your project files, and create the following main.tf file:
# Following this guide : https://www.scottyfullstack.com/blog/devops-01-aws-terraform-ansible-jenkins-and-docker/

terraform {
  required_providers {
    aws = {
      source  = "hashicorp/aws"
      version = "~> 3.0"
    }
  }
}

# Configure the AWS Provider
# Define the region
provider "aws" {
    region = "us-east-1"
}

# Using this documentation: https://blog.gruntwork.io/a-crash-course-on-terraform-5add0d9ef9b4
# Create the security group allowing inbound SSH and HTTP traffic
resource "aws_security_group" "instance" {
  name = "terraform-jekins-docker"
  description = "allow inbound traffic for SSH (any IP) and HTTP (only from my IP)"

  ingress {
    from_port   = 22
    to_port     = 22
    protocol    = "tcp"
    cidr_blocks = ["0.0.0.0/0"]
  }

  ingress {
    from_port   = 80
    to_port     = 80
    protocol    = "tcp"
    cidr_blocks = ["my.public.ip.0/32"] # specify your ip here
  }

  ingress {
    from_port   = 8080
    to_port     = 8080
    protocol    = "tcp"
    cidr_blocks = ["my.public.ip.0/32"] # specify your ip here
  }

    ingress {
    from_port   = 8000
    to_port     = 8000
    protocol    = "tcp"
    cidr_blocks = ["my.public.ip.0/32"] # specify your ip here
  }

  egress {
    from_port        = 0
    to_port          = 0
    protocol         = "-1"
    cidr_blocks      = ["0.0.0.0/0"] # outbound traffic to anything
    ipv6_cidr_blocks = ["::/0"]
  }
}

# Create the EC2 for Jenkins
resource "aws_instance" "jenkins" {

    ami = "ami-0022f774911c1d690"
    instance_type = "t2.micro"
    key_name = "us-east1-kpair"

    vpc_security_group_ids = [aws_security_group.instance.id]

    tags = {
        Name = "jenkins"
    }

}

#Create the EC2 for Docker web server
resource "aws_instance" "docker-web-server" {

    ami = "ami-0022f774911c1d690"
    instance_type = "t2.micro"
    key_name = "us-east1-kpair"

    vpc_security_group_ids = [aws_security_group.instance.id]

    tags = {
        Name = "docker-web-server"
    }

}
Here's what's happening in this file. We're telling Terraform to perform these actions for us:
- Create a security group that will allow HTTP and SSH inbound traffic. We're allowing HTTP (ports 80 and 8080) traffic only from my public IP, and SSH from any IP.
- Create an EC2 instance for Jenkins, t2.micro being the type we want to keep it within the Free Tier. We're using an Amazon managed image ami-0022f774911c1d690. Assign the security group previously created to this instance. Also define which key pair to use so we can SSH into the instance (check that you're using the correct key pair for the region).
- Do the same for the Docker instance, only changing the name and tag so we can differantiate the two instances.
If you want to use this same file, you'll need to specify the CIDR blocks for the HTTP traffic ports. You can use your own public IP, or 0.0.0.0/0 to allow any IP to connect.
The main.tf file is now complete. You can use it with these terraform commands:
Initialize the Terraforn directory:
terraform init
Check whether the configuration (your main.tf file) is valid:
terraform validate
Show changes required by the current configuration. Nothing is applied here, it's only to show whats changes will be made if you apply:
terraform plan
Create or update infrastructure. Will show the same plan than terraform plan, but will also ask for a confirmation before doing the changes:
terraform apply
Destroy previously-created infrastructure. Very handy since this is a one time project, and we want to keep withint the Free Tier.
terraform destroy
If you ran init, plan, and apply, you should now have two EC2 instances running in AWS! Congratulations!
Now you can check if your security group got correctly applied. You should be able to SSH in the two instances with:
ssh -i ~/path/to/your/keypair ec2-user@public-dns-of-instance
Ansible
Ansible is a suite of software tools that enables infrastructure as code. It is open-source and the suite includes software provisioning, configuration management, and application deployment functionality.
We already installed Ansible with brew at the beginning. Let's dive into this second part, where we'll tell Ansible what to do on the instances we launched.
Ansible works with a hosts file, called the inventory file, where it looks for host on which to do the commands. The hosts file is structured like this:
[dbservers]
db01.test.example.com
db02.test.example.com

[appservers]
app01.test.example.com
app02.test.example.com
app03.test.example.com
The headings in brackets are group names, which are used in classifying hosts and deciding what hosts you are controlling at what times and for what purpose.
Lets' make a folder, and create our inventory file:
mkdir ansible; cd ansible; touch aws-hosts
Then we edit the aws-hosts with the following:
[docker-web-server]
ec2-user@public_web_ip ansible_ssh_private_key_file=~/.ssh/yourKeyPair.pem

[jenkins]
ec2-user@public_jenkins_ip ansible_ssh_private_key_file=~/.ssh/yourKeyPair.pem
So now, when we'll reference jenkins or docker-web-server in our Ansible playbooks, Ansible we'll be able to reach our instances in AWS.
We'll now work on our playbook for Jenkins with the file provision-jenkins.yml:
---
- name: Configure Jenkins Server
  hosts: jenkins
  tasks:

    - name: Install Java Requirements
      yum:
        name: java-11
      become: yes

    - name: Jenkins dependencies
      shell: |
        wget -O /etc/yum.repos.d/jenkins.repo https://pkg.jenkins.io/redhat-stable/jenkins.repo
        rpm --import https://pkg.jenkins.io/redhat-stable/jenkins.io.key
      become: yes

    - name: Install Jenkins
      yum:
        name: jenkins
      become: yes

    - name: Run Jenkins
      shell: |
        systemctl enable jenkins
        systemctl start jenkins
      become: yes
This tells our host to install the Java required package, Jenkins dependencies, then install and launch Jenkins.
Now let's try to provision the instance with this playbook:
ansible-playbook -i aws-hosts provision-jenkins.yml
If you've done everything right up to here, you should have Jenkins running on the instance after a minute or two. Since we opend the ports on our instance, we should be able to reach it at http://{public-ip}:8080
Now we can do the same for the other instance with the new file provision-webserver.yml
---
- name: Provision Web Servers
  hosts: webservers
  tasks:

    - name: Install pip3
      yum:
        name: python3-pip
      become: yes

    - name: Install python docker sdk
      shell: |
        pip3 install docker
      become: yes

    - name: Install docker
      yum:
        name: docker
      become: yes

    - name: Start Docker
      shell: |
        systemctl start docker
        systemctl enable docker
      become: yes

    - name: Setup Docker Host for Remote Usage
      lineinfile:
        path: /lib/systemd/system/docker.service
        state: present
        regexp: '(ExecStart*.*)'
        line: ExecStart=/usr/bin/dockerd -H fd:// -H tcp://0.0.0.0:2375
      become: yes

    - name: Reload the Daemon and Restart Docker
      shell: |
        systemctl daemon-reload
        systemctl restart docker
      become: yes
With this file, we're installing pip3, Docker, the Python SDK for Docker, and then we're configuring Docker and reloading it. Run the playbook.
If you didn't get any errors, all should be done on the Docker host now!
Docker - Web server
We want to expose a web app on our Docker host. We'll make our own little web app with Falcon, a Python web framework, and then containerize it with Docker.
Make a new docker folder with three files:
requirements.txthello.pydockerfile
We need to define the requirements.txt of our Python app:
falcon==2.0.0
gunicorn==19.9.0
The Python app itself is quite simple hello.py:
import falcon

class HelloResource(object):

    def on_get(self, req, resp):
        resp.status = falcon.HTTP_200
        resp.body = ("Hello, World!")

class Page2Resource(object):

    def on_get(self, req, resp):
        resp.status = falcon.HTTP_200
        resp.body = ("This is the second page!")

app = falcon.API()
hello = HelloResource()
page2 = Page2Resource()

app.add_route('/', hello)
app.add_route('/page2', page2)
Finally, we need a file to tell Docker how to build our container. That's our dockerfile
FROM python:3

RUN pip install --upgrade pip

WORKDIR /hello_world

COPY requirements.txt .

RUN pip3 install -r requirements.txt

COPY . .

CMD ["gunicorn", "-b", "0.0.0.0:8000", "hello:app"]
Before building and pushing this container to your public repository, make sure to create it (https://hub.docker.com).
Now login to docker with the CLI:
docker login
Within the docker folder, you can then build the container, addind your account name, reposiroty name and tag:
docker build . -t account-name/repository:tag
Once it's built, push it to the repository:
docker push account-name/repository:tag
Jenkins : launch the container
Our Jenkins host is waiting for us! In your browser, head over to the IP:8080. To log in the first time, you need to retrieve a password on the host.
SSH into the host, and cat the file at /var/lib/jenkins/secrets/initialAdminPassword.
Log in as an admin without creating an account. Proceed to the default plugins installation.
We now need to do two things:
1. Add our Docker host SSH credentials:
Go into Manage Jenkins > Manage Credentials. Click onto (global) in the Domains list, and then Add Credentials. The kind should be SSH username with private key. Fill the fields and save!
2. Add our Docker host as a remote hosts:
Go into Manage Jenkins > Configure System. Find the SSH section, and fill it with the following:
- Private IP of the Docker host (172.x.x.x)
- Port 22
- Select the SSH credentials create on step one
Check the connection with the button below! Apply and Save, you should now have a working connection!
Last step! We create a new Freestyle project, with only one build step: Execute shell script on remote host using ssh
The script we want to run is:
sudo docker run -dit --name hello_world -p 8000:8000 account-name/repository:tag
Save your project, and build it with Build Now.
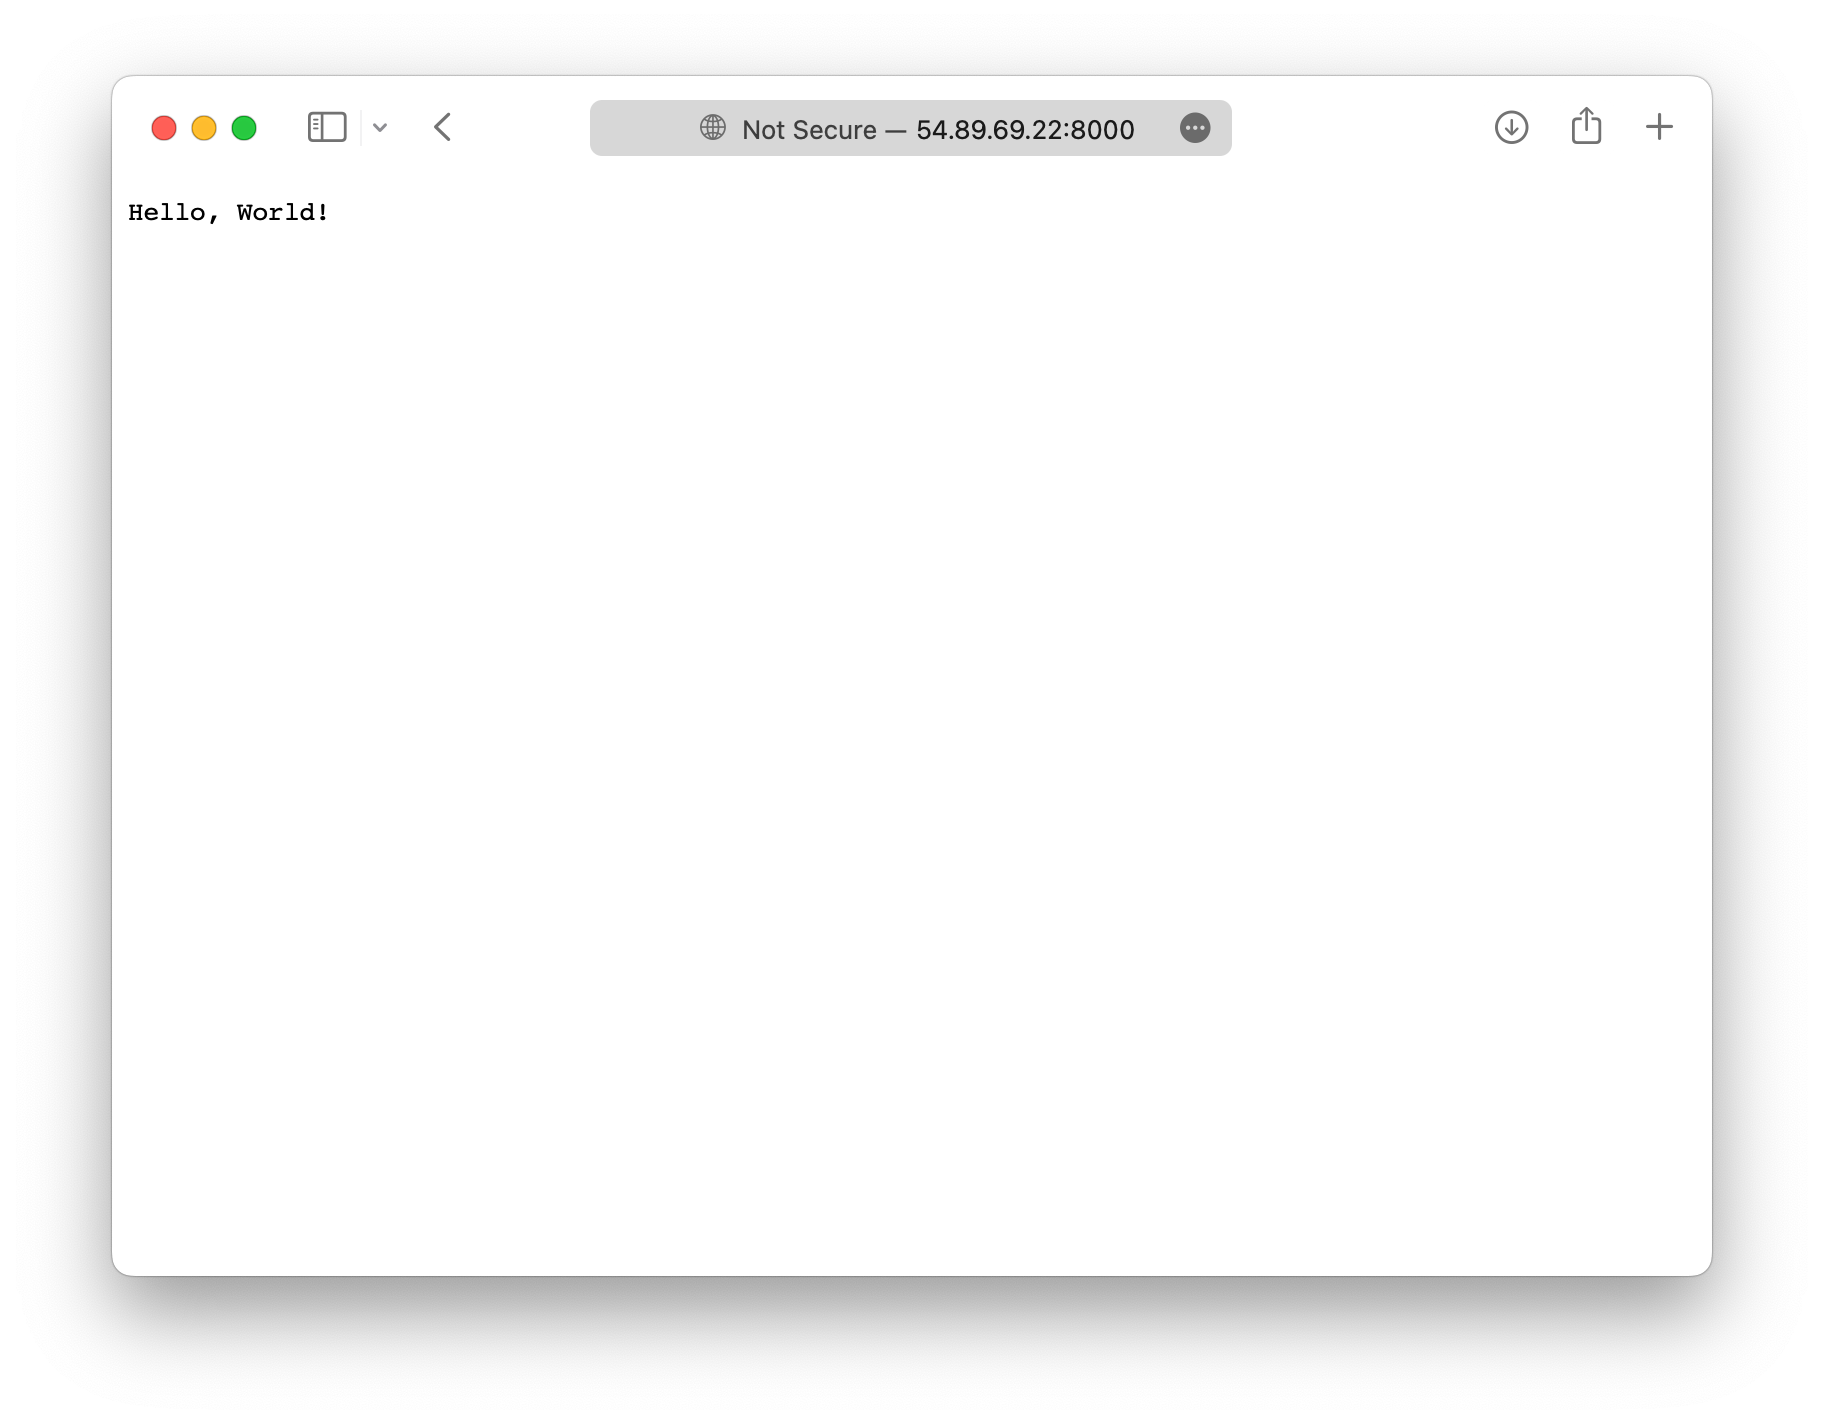
Reach for the Console output to read the logs and confirm everything went well. If that's the case, you should have a working web app at docker-host-ip:8000. You should also be able to reach /page2.

All done! 🎉 This is a great way to experiment with Terraform and Ansible. You can build on this with a different container image, or any other Ansible configuration you might want to try.
Don't forget to terraform destroy when you're finished.
- ← Previous
Privacy oriented Firefox set-up - Next →
Projet: Radio-Canada Mini